On-Premises SSO Module 2.0.0.0, 2.0.0.1, 2.0.0.2
![]()
Redwood applications can be configured to authenticate against an external security provider which supports the Security Assertion Markup Language (SAML) standard, as defined by RFC 7522. SAML can be used to directly integrate with, for example, your Active Directory domain controller using Active Directory Federation Services, or through online middleware providers such as OneLogin and PingIdentity. When using SAML Authentication, Single Sign-On (SSO) will be enabled, which means that computers that are part of the domain can transparently login to Redwood.
This document describes how to enable Redwood applications to use SAML authentication.
SSO Authentication via SAML
SAML is an XML and HTTP based secure, industry-standard way to perform SSO between online applications.
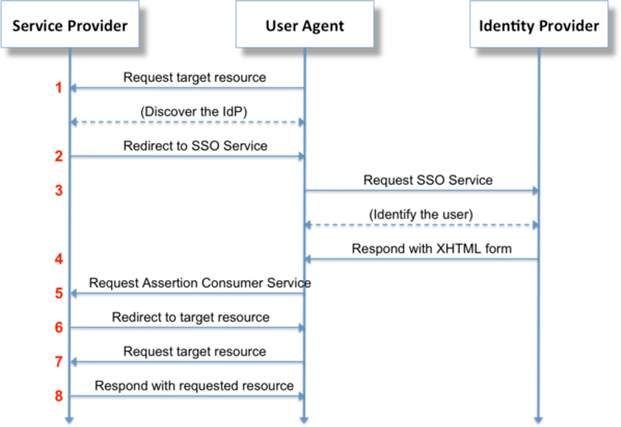
Identity Providers (IdP)
Redwood SSO allows integration with any authentication provider that supports SAML. The IdP is part of the customer's network and their responsibility. You will need to provide a file with the IdP’s metadata, and then upload Redwood SSO metadata to the IdP, completing a secure handshake between the two.
Service Provider (SP)
Redwood SSO is the service provider. Once configured, it will redirect users to the IdP to authenticate them, then pass them to the Redwood product already logged-in.
SSO Installation
This section describes how to install the Redwood SSO capabilities.
Prerequisites
- RunMyJobs 9.2.8 or later.
- Requested, downloaded, and extracted
redwood-sso.zipfile. - Redwood product configured to run in
httpsmode. -
Users base (LDAP, database, application authentication) has been configured for the Redwood product with a matching ID field (preferred: email address) that will be used from the Identity Provider. Users are not automatically created, but can be imported automatically from the user base on first login (RunMyJobs).
- On Windows systems, the 32-bit version of the Visual C++ Redistributable for VS 2012 (
vcredist_x86.exe) must be installed. This can be downloaded from the following location:
Visual C++ Redistributable for Visual Studio
Installation
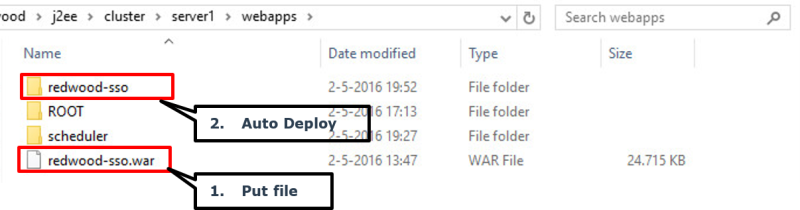
Move or copy the redwood-sso.war file into the following directory:
${INSTALL_DIR}/j2ee/cluster/server1/webapps
SSO Configuration
The example setup below assumes your Redwood product is running on ip-address 10.44.0.184 and port 8443.
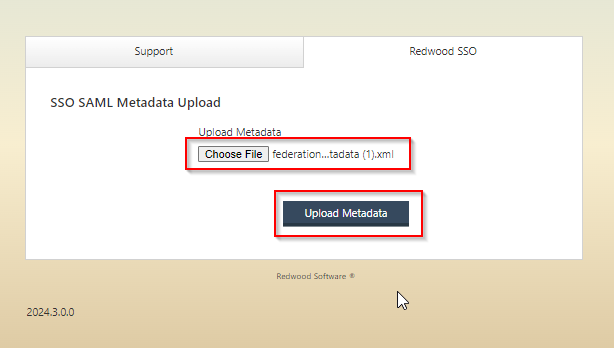
1. Upload IdP Metadata
Request the metadata for your IdP in XML format.
Once obtained, navigate to https://10.44.0.184:8443/redwood-sso/ (you will be redirected to https://10.44.0.184:8443/redwood-sso/?action=configurations/upload/).
Click Choose file, navigate to your metadata file, and then click Upload Metadata.
2. Download Redwood’s Metadata File
Click Download Metadata to download the Redwood metadata file.
Provide the downloaded metadata file to the IdP administrators. You cannot continue to the next step until they have confirmed they have uploaded the metadata and have everything configured.

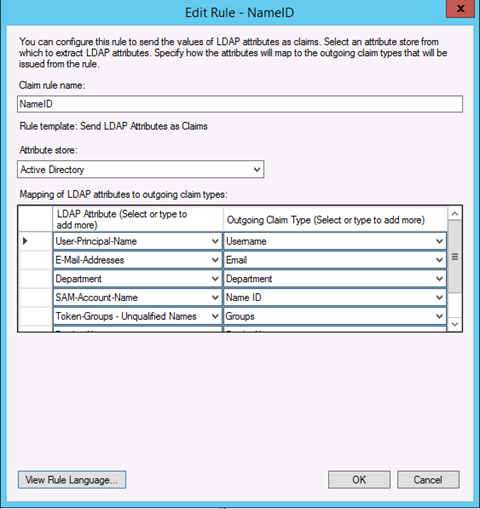
3. Set Up an IdP Claim Rule
In your Identity Provider, the Claim rules/transformation rules that must be set with the name "NameID" are:
- Email: This will be used as your username.
- DisplayName: Used for first name last name.
- Groups: Used to filter access groups to set correct access.
Other rules can be sent over and will be ignored.
Example: ADFS setup
4. Verify SSO
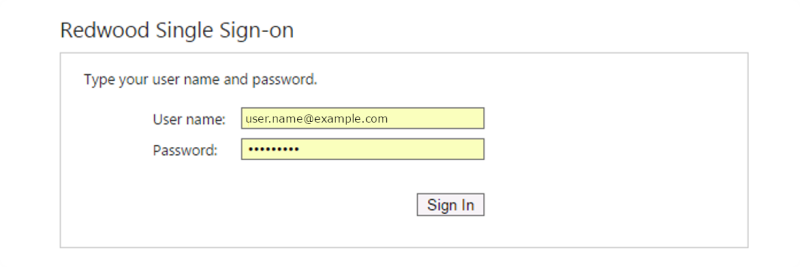
Once the IdP administrators have confirmed that the Redwood SSO metadata file is loaded and registered, click Next Step: Verify. This should redirect you to your IdP and shown a domain login screen or custom login provider. This part will look different for every customer, because each will be using their own IdP. For this document, we are using the Redwood IdP. To get to the Verify page without the previous steps you can use following URL: http://<host>:<port>/redwood-sso/?action=configurations/verify/.
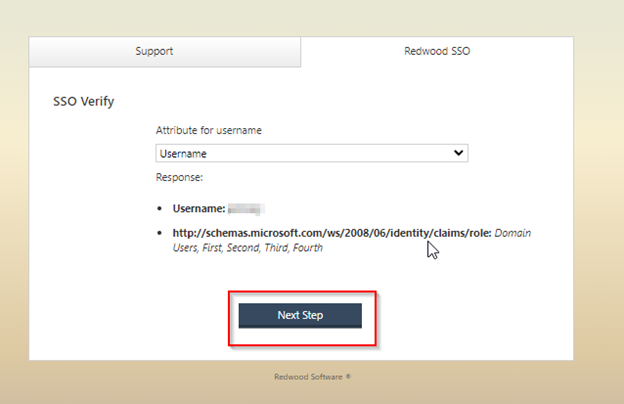
Once logged in to the IdP, you will be redirected back to the final step: configuring SSO. You will be shown a drop down with a list of attributes. Yours will look different to below depending on the attributes passed back by the IdP. Select which attribute should be used to identify users within the Redwood product. We recommend you use an email address.

Before being able to enter all of this information, you will need the SSO secret. See the next section for details.
5. Force SSO in the Redwood product
A. Import the saml.car File
For RunMyJobs installations, import the saml.car file.
B. Run SAML_GetPhpToken
In a separate window, log into RunMyJobs via the non-SSO login method (https://10.44.0.184:8443/scheduler/?rw_no_sso=1) and run the Process Definition named SAML_GetPhpToken. Once the Process Definiton has run, locate and click the file named secret in the Detail View.
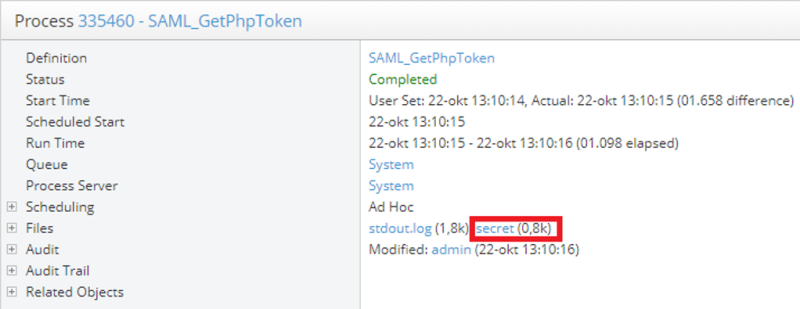
This file will contain a long string. Copy the entire string and store it before going back to the SSO Configuration screen.
C. Add the External Registry Entry
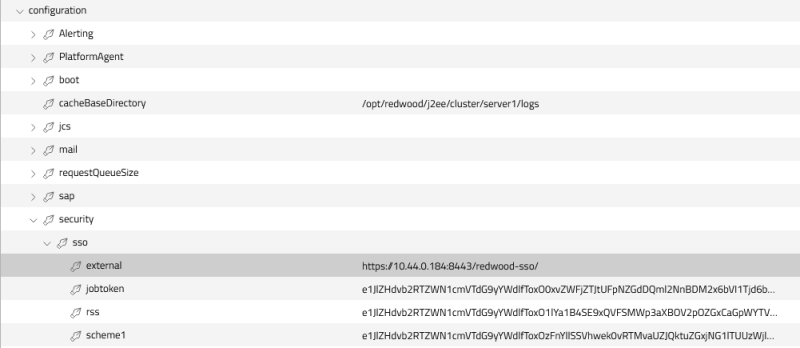
To redirect product logins to the SSO web application, add the registry entry /configuration/jcs/security/sso/external with value https://10.44.0.184:8443/redwood-sso/.
If you want to skip the redwood-sso login page, add ?action=authenticates/authenticate/ to the URL.
D. Add the nexturiparameter Registry Entry
If you want to make sure that end users end up at their originally requested URL, add the registry entry /configuration/jcs/security/sso/nexturiparameter and set its value to ssoUrl.
6. SSO Configuration
In the SSO Configuration screen (http://<host>:<port>/redwood-sso/?action=configurations/edit/), paste the secret string into the Product SSO secret field. Then enter the URL of the product, including the protocol (https://), domain name (10.44.0.184), and port (8443) and the product suffix (the RunMyJobs default is /redwood).
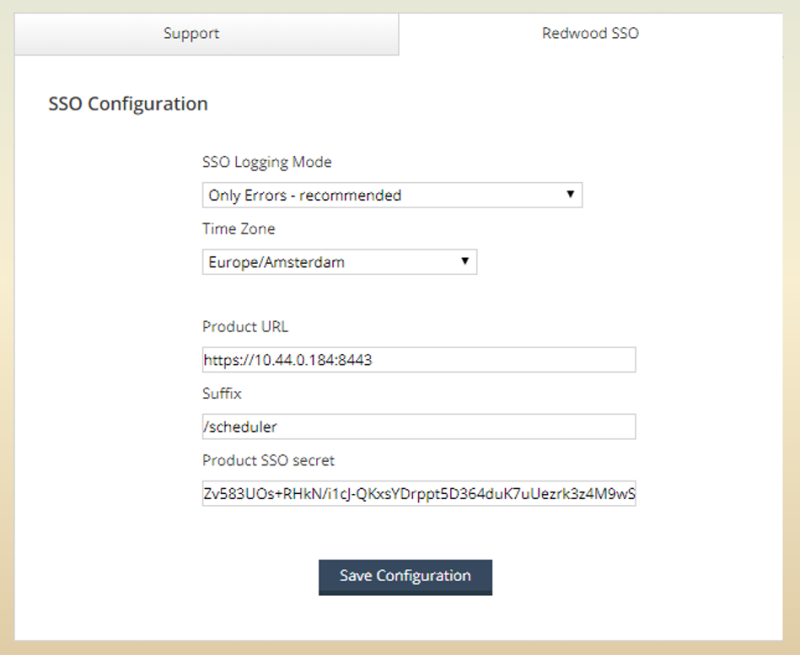
Click Save Configuration to store the SSO configuration setup. You will be redirected to the confirmation page. Click Login Page to navigate to the product (you have already authenticated with the IdP during the verify step).

7. Upgrade the SSO Web Application
The following steps are required to upgrade the SSO web application.
A. Secure and Remove the Old SSO Web Application
Remove the redwood-sso.war file from the following directory:
${INSTALL_DIR}/j2ee/cluster/server1/webapps
Rename the existing sso directory:
mv redwood-sso redwood-sso-oldB. Deploy the new SSO Web Application
Put the new redwood-sso.war file in the webapps directory and wait for it to deploy.
C. Restore configuration settings
Copy the following files into the corresponding redwood-sso directories:
redwood-sso-old/config/sso.confredwood-sso-old/config/metadata.conf
After you confirm that everything is working, you can remove redwood-sso-old.