Managing Users and Roles
Introduction
User ID and password credentials are required to gain access to a Redwood SaaS customer account. User types and roles further restrict what functionality is available to users. This topic provides an overview of the user types and roles provided by Redwood.
Note: To edit user and role definitions, you must have access to the Redwood Cloud Portal.
Setting User Privileges
To create or edit users and their privileges, open the Redwood Cloud Portal, navigate to Security > Users and click the Manage tab at the top. Configured users (if any) are listed to the right of the navigation bar.
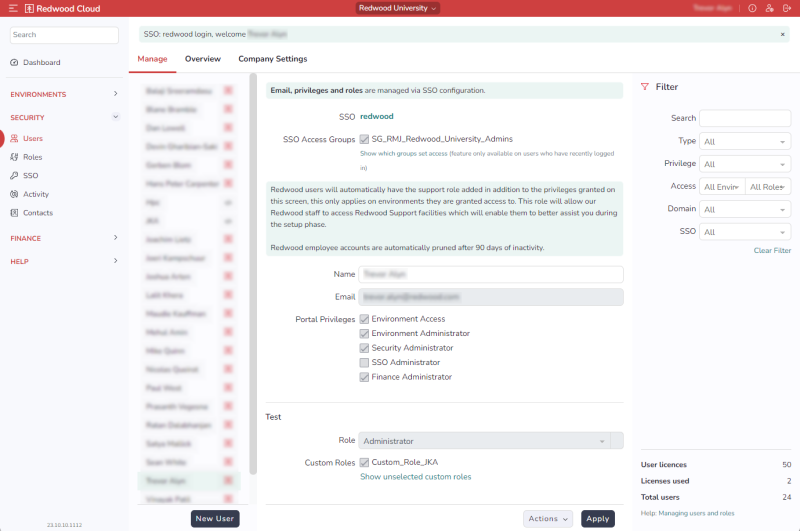
To create a new user:
-
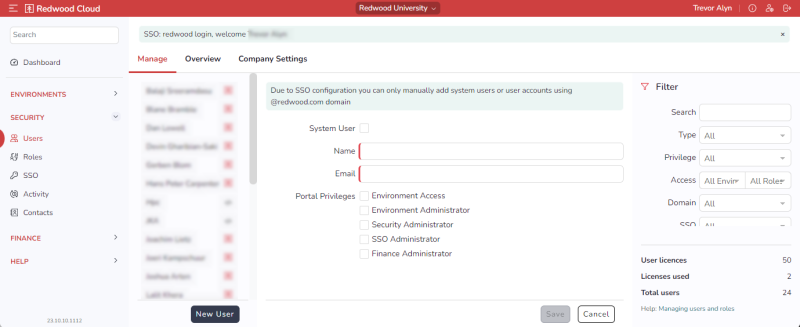
Click New User at the bottom.
-
If the user should be a system user, check System User. For more information about System Users, see below.
-
Enter the user's name in user-readable format in the Name field.
-
Enter the user's email address in the Email field.
-
Set the user's portal privileges by checking the appropriate boxes under Portal Privileges. The available portal privileges are listed below.
-
Below the Portal Privileges controls, there is a section for each environment. Each environment has a Role dropdown list. Select an option for each environment.

Note: By default, customers will get access to three environments: "Development", "Test", and "Production". (Note that the names of these environments can be changed by Environment Administrator users if required). Additional environments can be purchased when necessary; contact your Account Manager for more information.
- No Access: A user with this role in a given environment will not see a Connect button for that environment in the dashboard.
- Login: A user with this role in a given environment can connect, but can view or interact with objects only via custom roles.
- Viewer: A user with this role has view-only access the environment. Such users cannot submit processes, nor can they create and edit objects.
- Operator: A user with this role has access to functions required for day-to-day operations of the environment. Such users can submit and monitor processes, and they can stop and start connections to managed environments. However, they cannot create or edit objects.
- Business: A user with this role can create business-user-specific screens.
- Administrator: A user with this role has full access to administer the environment. Such users can create, edit, and delete objects; monitor and submit processes; stop and start Queues/connections; create connections to managed systems; and administer object-level security (except for Secure Gateway configuration on the Process Server).
- Cloud Administrator: A user with this role has the same access as the Administrator, plus the ability to manage Secure Gateway configuration.
-
If a user requires a custom role in a given environment, check that custom role in that environment. For more information about custom roles, see Custom Roles.
-
Click Save.
Note: Changing a user's role can have an impact on scheduled workload. For example, if a user with Operator access submits a recurring process, and that user is then changed to a Viewer, the recurring process will fail. This is because at execution time, RunMyJobs will attempt to execute the process using the privileges of the user that submitted the process. If you experience this, use the System_ChangeOwner Process Definition to change the owner of the recurrence. Perform a dry run first to ensure you have selected the correct objects to update.
Portal Privileges
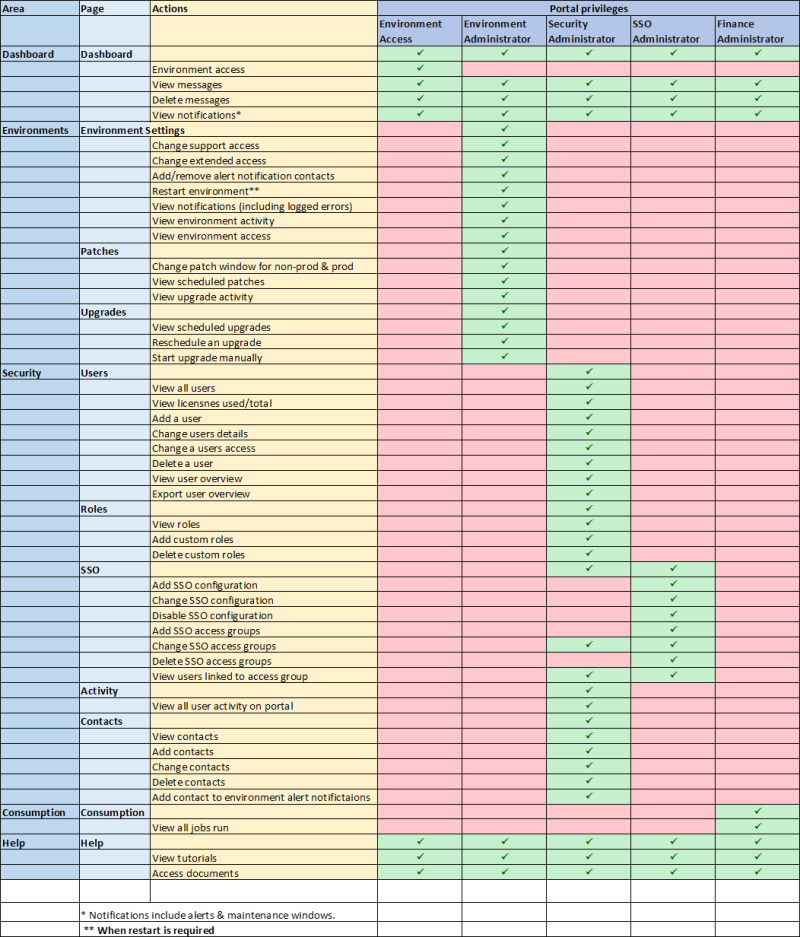
The available portal privileges are as follows.
- Environment Access: Provides basic access to the Redwood Cloud Portal, including the Environments and Help sections of the Redwood Cloud Portal.
- Environment Administrator: Provides access to the Environments section of the Redwood Cloud Portal, where an Environment Administrator can edit environment details and view activity logs.
- Security Administrator: Provides access only to the Security section of the Redwood Cloud Portal, where a Security Administrator can add, edit, and delete users, custom roles, and contacts. Security Administrators can also view activity logs and manage existing SSO groups.
- SSO Administrator: Provides access to the Security section of the Redwood Cloud Portal, where an SSO Administrator can manage the SSO configuration and add new SSO groups.
- Finance Administrator: Provides access to the Finance section of the Redwood Cloud Portal. Finance Administrators are NOT counted against your user allowance, because they cannot access environments.
Note: These portal privileges cannot be modified.
The table below shows the capabilities associated with each type of portal privilege.
System Users
A System User is an unnamed user with API access only. System Users bypass SSO configuration, so their passwords must comply with Redwood password complexity rules. To create a System User, check System User when creating the user.
Note: System User passwords never expire.
Non-SSO Password Policies
When an Administrator creates a User in the Redwood Cloud Portal, an email is sent to that user, asking them to set their password.
Redwood strongly recommends using SSO for password management. If you use SSO, your Identity Provider can control all security and monitoring. However, if you do NOT use SSO, the policies for passwords are as follows.
-
A new password cannot be the same as any of the previous ten passwords.
-
Maximum password age: 90 days.
-
Minimum password age: No restriction.
-
Lockout threshold: Accounts are locked after five failed login attempts. When a user's account is locked, an unlock link is sent to the User's email.
-
Lockout duration: Indefinite. The account remains locked until an administrator unlocks the account in the Redwood Cloud Portal.
-
Reversible encryption: No.
-
MFA: Browser must be verified via authentication number.
Non-SSO Password Complexity Rules
Non-SSO user passwords must follow these compleixity rules:
- Passwords must contain at least one lower-case character.
- Passwords must contain at least one upper-case character
- Passwords must contain at least one number.
- Passwords must contain at least one symbol.
- Passwords must contain at least 12 characters.
- Common passwords are not allowed.
Setting a Default Timeout Period
The default timeout period for the Redwood Cloud Portal is 30 Minutes. This is the duration of inactivity before an inactive user is logged out of the Redwood Cloud Portal.
-
Who Can Change it — A User with a Security Administrator role.
-
How to Change it — In the Redwood Cloud Port UI, navigate to Security > Users > Company Settings. Select a value from the dropdown list.
-
Valid Values — Select an option from the Timeout dropdown list.
-
Minutes:
5,15,30, and45 -
Hour:
1
-
User Inactivity
Any users created via an SSO configuration will be removed after 90 days of inactivity. Access will not be blocked, however. After 90 days, a user can log in if they still have access, and their configuration will be re-created automatically. This is a security measure for when a user leaves a company, because there is no way for the identity provider to inform the portal that a user has left. This also applies to Redwood Professional Services accounts - for example, if have granted them access to your system for support or consultancy work.
SSO User Licenses
When SSO is configured, adding users to groups is managed in your user management system. SSO users are added as soon as they access the Dashboard and count towards the license. User privileges are synchronized each time they log in,and are not automatically removed when you remove them from your SSO system or remove their access. Inactive users will see their account, but not their privileges nor their access, removed after 90 days. They will be able to log in again, provided they still have access according to the SSO system.
Every user that has access to the dashboard and that successfully logs in is counted towards the license. If you wish to remove a user from the license count, you must remove that user's access in the dashboard. If you do not remove the user from the SSO access groups, the user can log in again and will count towards the license once more.
Users that have been removed due to inactivity no longer count towards the license. However, if a user is still in the access groups, they will be able to log in and will once again count towards the license.
No synchronization is performed with the SSO system to find users for which access has been removed from access groups and still have an account. A user that has been removed from the access groups will not be able to log in, but will continue to count towards the license until the user attempts to log in, the user's access is removed by an SSO administrator, or the user is purged due to inactiviNo Access: A user with this role in a given environment will not see a Connect button for that environment in the dashboard.
For more information about SSO, see SSO Configuration
User Overview
To view a summary of all users, including their name, email, and role in each environment, navigate to Security > Users and then click the Overview tab at the top. This screen also shows which users are counted against your license.
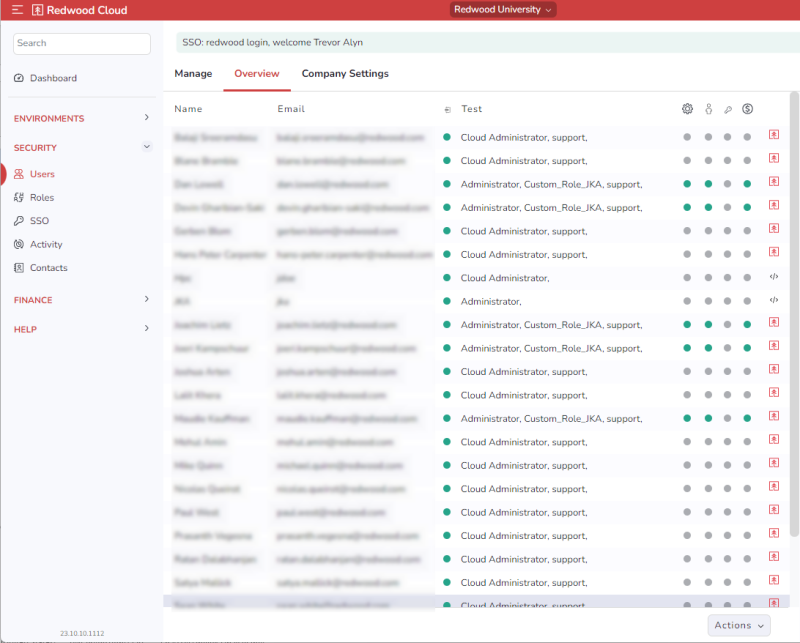
Note: If a Redwood icon displays for a user, that means the user is a Redwood user, and as such is not counted toward the license.
To export this information, choose an option from the Actions dropdown list at the bottom. The options are as follows:
-
Export (monthly)
-
Export (quarterly)
-
Export now
-
Manage scheduled exports
Allowing Redwood Employee Access
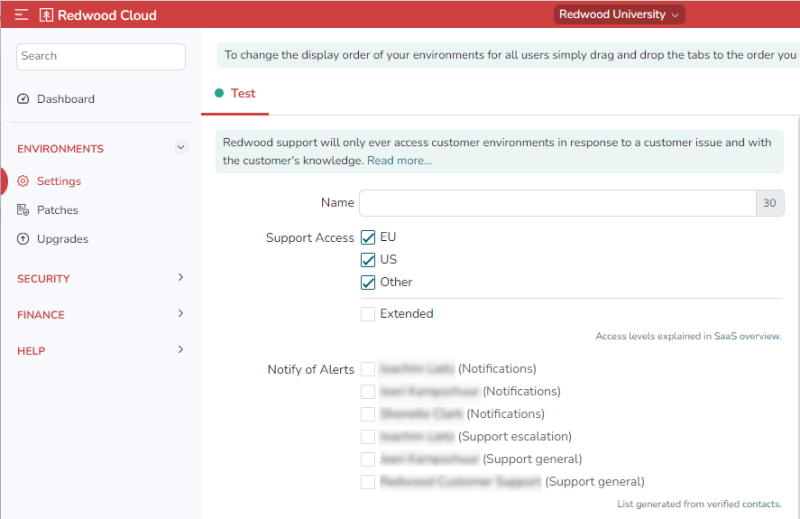
By default, Redwood support has read-only access to customer environments for helping with support issues. To modify this access:
-
Navigate to Environments > Settings.
-
Click the tab at the top for the target environment.
-
To allow or disallow Redwood access for the available support regions, go to Support Access and check or uncheck EU, US, and/or Other.
-
To allow extended access, which allows Redwood support staff to extend support access to Redwood developers, check Extended.
Even if none of these above boxes is checked, you can create dummy users to allow Redwood support access to your environment, or simply add Redwood support personnel as regular users using their @redwood.com email addresses.