Viewing Decision Point Details
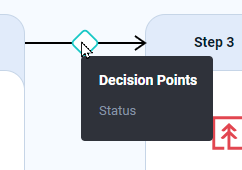
When you add a Decision Point to a Job or Step, a Decision Point icon  displays next to that Job or Step. Hover over the icon to see information about the Decision Point. For example, this juncture uses a Status Decision Point.
Note: Decision Points on Jobs are always visible, but Decision Points on Steps are visible only if you turn on the View Details switch.
Once you have added a Decision Point to a Workflow, you can view a graphical representation of the Decision Point by switching on the View Details switch at the bottom of the Workflow Editor. This will update the chain diagram with arrows that indicate which status, Time Window, or REL expression each Decision Point branches on, where it branches to, and which direction the flow goes.
-
Status Decision Points display a colored badge.
-
Time Window Decision Points display a badge beginning with "Time." The badge also indicates that the arrow shows where the flow will go if that Time Window is not in effect (Not Met).
-
If Decision Points display a badge beginning with "If." The badge also indicates that the arrow shows where the flow will go if the REL expression evaluates to False (Not Met).

If a Status Decision Point uses more than one status, this is indicated on the status badge by a number. You can hover over this badge to display a tooltip with all mapped statuses.
