Working With Escalations
Assume that when you raise a particular alert, you want RunMyJobs to automatically notify a particular person. Furthermore, if that person is on vacation or doesn't respond promptly, you want to forward the issue to a different person so that they can follow up on it. This is an example of a situation where you might want to use escalations.
An escalation is basically just a named object that contains the following things:
-
The address of a person to be notified.
-
A delay, to give that person a chance to respond to the alert.
-
A reference to another escalation, to be used if nobody responds within the time specified by the delay.
-
An optional post-alert script to be executed after the escalation is triggered.

You can specify an initial escalation when you create an alert source, and that escalation can then trigger other escalations.

Note: When a condition specified in an alert source does not match an escalation, then no alert is sent.
Note: It is possible to create escalation loops. Redwood recommends that you add a delay of at least one minute between escalations to avoid overloading your mail server or clients.
Creating an Escalation
To create a simple escalation:
- Navigate to Alerting > Alert Escalations.
- Click
 .
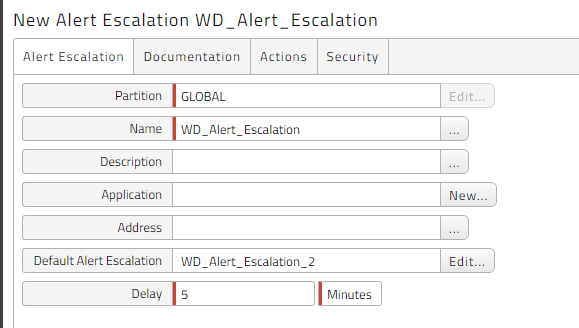
. - Enter a Name, and optionally a Description and/or Application.
- Enter the address of the recipient in the Address field.
- Enter a Delay for RunMyJobs to wait before escalating the issue further. The alert will be forwarded to the next escalation after this amount of time.
- Select or create a Default Alert Escalation or create an Escalation Expression. The Escalation Expression field supports
${variable}substitutions and Redwood Expression Language syntax. If you specify an Escalation Expression, the Default Alert Escalation is ignored. - Click Save & Close.
Deleting Alert Escalations
You can delete alert escalations only if no other objects relate to them. For example, if there are process alert sources that use an escalation, the escalation cannot be deleted until all process alert sources that use it have been modified. You can see all process alert sources that relate to an escalation under Related Objects in the Detail View.
Example Escalations
The following examples demonstrate how to configure escalations.
Three-stage Escalation
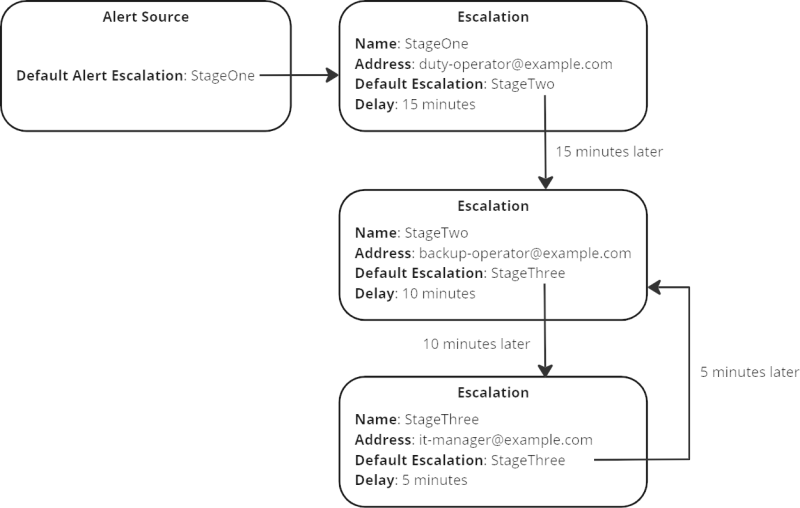
In this example, an alert source has a Default Alert Escalation named StageOne. StageOne, in turn, has a Default Escalation of StageTwo, and StageTwo has a Default Escalation of StageThree. When an issue occurs (as defined in the alert source), an Operator Message is created (as defined in the alert source), and an email is immediately sent to duty-operator@example.com. If that person doesn't get the email or doesn't respond to the Operator Message within 15 minutes, an email is sent to backup-operator@example.com. After that, the issue is escalated to it-manager@example.com.

Three-stage Escalation with Loop
This example is the same as the last one, except for the fact that the StageThree escalation points to itself as the next Default Escalation. As a result, an email is sent to it-manager@example.com every five minutes until the Operator Message is acknowledged.

Context Menu
The following context menu actions are specific to escalations.
Note: For generally applicable object context menu options, see Object Context Menu.
| Action | Description |
|---|---|
| Show diagram | Displays the escalation's dependencies in a diagram. |
Alert Escalation Actions
The Actions tab for an escalation lets you specify a RedwoodScript script to be executed after the escalation is raised. You can use the following objects in such a script.
| Object | Class | Example Code |
|---|---|---|
jcsOutLog
|
com.redwood.scheduler.infrastructure.logging.api.Logger | jcsOutLog.info("This is an informational message");
|
jcsAlertEscalationPostAlertContext
|
com.redwood.scheduler.api.scripting.variables.AlertEscalationPostAlertActionScriptObject | jcsAlertEscalationPostAlertContext.isResend()
|
jcsSession
|
com.redwood.scheduler.api.model.SchedulerSession | jcsSession.getQueueByName("PRD_Queue");
|
Note: The jcsSession object is available only if you have specified an Action Subject.
Security
The privileges available in the Security tab are as follows.
For more information, see Security Tab.
| Privilege | Description |
|---|---|
| AlertEscalation.Create | Create alert escalations |
| AlertEscalation.Delete | Delete alert escalations |
| AlertEscalation.Edit | Edit alert escalations |
| AlertEscalation.View | Access alert escalations |